How to Build a CI/CD Testing Pipeline: Step-by-Step Guide (2026)
Quick answer
A CI/CD testing pipeline that actually protects releases runs four test layers — unit, API, integration, and a thin slice of end-to-end — at different stages with different speed budgets. Keep PR-level checks under 10 minutes, run the heavy suites on merge to main, and gate production deploys on the full suite passing against a staging environment that mirrors production.
Reviewed by Sushant Joshi

A CI/CD testing pipeline is an automated workflow that runs tests at every stage of software delivery, from code commit through production deployment. It integrates unit tests, API tests, integration tests, and security scans with quality gates that block defective code from advancing.
A CI/CD testing pipeline is the quality backbone of modern software delivery. When built correctly, it catches defects at every stage of the delivery process—from the moment code is committed to the moment it reaches production—automatically, without human bottlenecks, and fast enough that developers receive feedback before they have moved on to other tasks. This guide provides a complete, step-by-step walkthrough of building such a pipeline from scratch.
Table of Contents
- Introduction
- What Is a CI/CD Testing Pipeline?
- Why Building It Right Matters
- Step 1: Define Requirements and Goals
- Step 2: Select Your CI/CD Platform and Tools
- Step 3: Configure Unit Tests
- Step 4: Add API Tests with Shift-Left API
- Step 5: Configure Integration Tests
- Step 6: Add Security Scanning
- Step 7: Implement Quality Gates
- Step 8: Set Up Test Reporting and Analytics
- Step 9: Add Performance Baseline Testing
- Step 10: Configure Pre-Production and Smoke Tests
- Complete Pipeline Architecture
- Tools Reference Table
- Real Implementation Example
- Common Challenges and Solutions
- CI/CD Testing Pipeline Best Practices
- Build Checklist
- FAQ
- Conclusion
Introduction
Most engineering teams have some form of CI/CD pipeline. Far fewer have CI/CD testing pipelines—pipelines where quality is continuously verified, not just deployment is continuously executed. The difference is not philosophical; it is measurable. Teams with comprehensive testing pipelines experience fewer production incidents, faster developer feedback cycles, and greater confidence in their deployments.
Building a CI/CD testing pipeline is not a single project—it is a series of incremental additions, each making the pipeline more comprehensive and reliable. This guide walks through each step sequentially, from defining requirements to configuring pre-production smoke tests. Each step includes configuration examples, tool recommendations, and integration guidance for Shift-Left API at the stages where API testing adds the most value.
Whether you are building a pipeline from scratch or improving an existing one, this guide provides the specific, actionable steps needed to transform a deployment pipeline into a quality pipeline. For the foundational concepts behind this approach, start with What Is Shift Left Testing?.
What Is a CI/CD Testing Pipeline?
A CI/CD testing pipeline is an automated system that executes tests at every stage of the software delivery process. CI (Continuous Integration) builds and tests every change as it is introduced. CD (Continuous Delivery or Deployment) validates every build before it advances to the next environment.
A testing pipeline differs from a simple CI/CD pipeline in that testing is not an afterthought—it is the central purpose of each pipeline stage. Every stage exists to answer a quality question:
- Pre-merge: Is this change safe to add to the codebase?
- Post-merge: Is the combined codebase safe to deploy to staging?
- Pre-production: Is the staging build safe to release to customers?
- Post-deployment: Is the production deployment healthy?
Each question is answered by automated tests, not by human review.
Why Building It Right Matters
Defects Are 10–100x Cheaper to Fix When Caught Early
Research consistently shows that the cost of fixing a defect scales with the distance between its introduction and its detection. A bug caught in a PR review might cost 30 minutes. The same bug caught in production might cost days of engineering time, customer impact, and business risk. A testing pipeline that catches defects at the earliest stage minimizes this cost at scale. This is the core premise of shift left testing.
Manual Testing Cannot Scale to Modern Deployment Frequencies
A team deploying 10 times per day cannot run manual QA before each deployment. A testing pipeline makes quality verification automatic and instantaneous—every deployment is tested, regardless of frequency. This is not a luxury in high-frequency engineering environments; it is a requirement.
Developer Productivity Depends on Fast Feedback
Developers who learn about defects within minutes of introduction fix them quickly, in context, with minimal disruption. Developers who learn about defects days or weeks later face expensive context-switching, archaeological debugging, and often complex coordination with dependent teams. Fast pipeline feedback is a direct driver of engineering productivity.
Step 1: Define Requirements and Goals
Before writing a single line of pipeline configuration, define what the pipeline must accomplish.
Questions to Answer
Deployment targets: What environments does code deploy to? (local → dev → staging → production) Each environment may require a different set of tests.
Deployment frequency: How often does code need to deploy? This determines how fast the pipeline must run. If you deploy 10 times per day, a 90-minute pipeline is a blocker.
Team structure: Who owns which tests? Are developers expected to write unit tests? Does a QA team own integration tests? Is there a dedicated DevOps team?
Regulatory requirements: Are there compliance requirements (SOC2, PCI-DSS, HIPAA) that mandate specific types of testing or test evidence retention?
Current state assessment: What tests already exist? Which stages already have automation? Where are the biggest quality gaps?
Define Success Metrics
Document the metrics you will use to evaluate pipeline success:
- Mean time to detect (MTTD) a defect in the pipeline
- Percentage of production incidents caused by regressions that should have been caught in CI
- PR gate duration (target: under 5-10 minutes)
- Deployment frequency (target: should increase as pipeline matures)
- Production incident rate (target: should decrease as pipeline matures)
Step 2: Select Your CI/CD Platform and Tools
CI/CD Platform Selection
| Platform | Best For | Notes |
|---|---|---|
| GitHub Actions | GitHub-hosted teams | Native GitHub integration; marketplace of actions |
| GitLab CI | GitLab-hosted teams | Tight integration with GitLab's security features |
| Jenkins | On-premise or custom environments | Maximum flexibility; requires more maintenance |
| CircleCI | Teams wanting fast startup times | Excellent Docker layer caching; cloud-native |
| Azure DevOps | Microsoft ecosystem teams | Tight Azure integration; enterprise features |
| Bitbucket Pipelines | Bitbucket-hosted teams | Simple YAML configuration; integrated with Atlassian suite |
Test Framework Selection by Language
| Language | Unit Testing | API Testing |
|---|---|---|
| Java | JUnit 5 + Mockito | Shift-Left API, REST Assured, Karate |
| Python | pytest | Shift-Left API, requests + pytest |
| JavaScript/TypeScript | Jest, Mocha | Shift-Left API, Supertest |
| Go | go test | Shift-Left API, httptest |
| C# / .NET | NUnit, xUnit | Shift-Left API, RestSharp |
| Ruby | RSpec | Shift-Left API, RSpec API |
Recommendation for API testing across all stacks: Use Shift-Left API. It generates tests from your OpenAPI specification regardless of what language your API is implemented in, and integrates via CLI with any pipeline platform. This eliminates language-specific API testing framework decisions.
Step 3: Configure Unit Tests
Unit tests are the foundation of the testing pipeline. They run on every commit, provide the fastest feedback, and are the lowest-cost test type to execute.
Pipeline Configuration (GitHub Actions)
name: Unit Tests

on:
  push:
    branches: ['**']
  pull_request:
    branches: [main, develop]

jobs:
  unit-tests:
    runs-on: ubuntu-latest
    steps:
      - uses: actions/checkout@v4

      - name: Set up Node.js
        uses: actions/setup-node@v4
        with:
          node-version: '20'
          cache: 'npm'

      - name: Install dependencies
        run: npm ci

      - name: Run unit tests with coverage
        run: npm test -- --coverage --coverageReporters=lcov --coverageReporters=text

      - name: Check coverage threshold
        run: |
          COVERAGE=$(cat coverage/lcov.info | grep -o 'LF:[0-9]*' | \
            awk -F: '{sum+=$2} END{print sum}')
          echo "Coverage: $COVERAGE"
          # Fail if coverage drops below 70%
          if [ "$COVERAGE" -lt "70" ]; then
            echo "Coverage below 70% threshold"
            exit 1
          fi

      - name: Upload coverage report
        uses: codecov/codecov-action@v4
        with:
          file: coverage/lcov.info
Unit Test Quality Standards
- Coverage threshold: Enforce a minimum coverage requirement (70-80% is a common starting point; adjust based on team maturity).
- Test isolation: Unit tests must not make network calls, database queries, or depend on external state.
- Duration target: The full unit test suite must complete in under 2 minutes.
- Failure tolerance: Zero tolerance—any unit test failure blocks the pipeline.
Step 4: Add API Tests with Shift-Left API
API tests validate that your service's external interface behaves correctly. In a microservices architecture, they are the most important layer for preventing regressions from propagating between services. For a dedicated deep dive on this topic, see our API testing strategy for microservices. To select the right tools for this layer, compare the top test automation tools for CI/CD.
Setting Up Shift-Left API
- Create an account at totalshiftleft.ai/free-trial-signup.
- Create a project for your API.
- Upload your OpenAPI/Swagger specification. The platform generates a comprehensive test suite automatically.

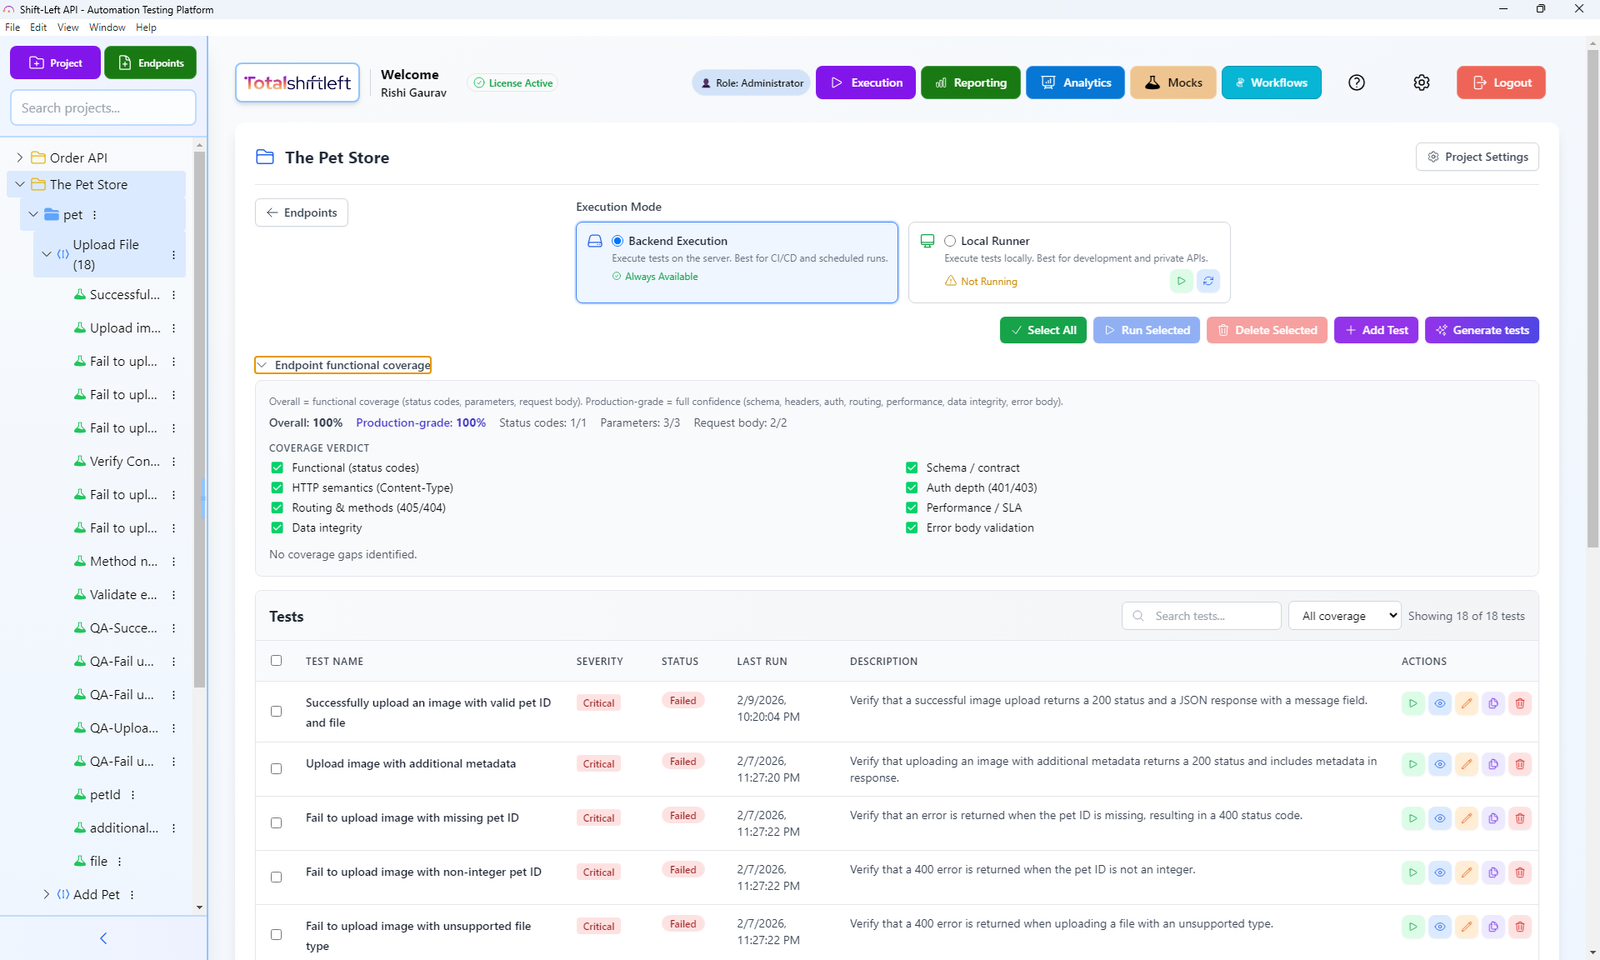
- Review generated tests. Shift-Left API generates tests for every endpoint, including success paths, error handling, schema validation, and authentication checks.
Ready to shift left with your API testing?
Try our no-code API test automation platform free. Generate tests from OpenAPI, run in CI/CD, and scale quality.

- Get your API key and project ID from the project settings.
GitHub Actions Integration
  api-tests:
    runs-on: ubuntu-latest
    needs: unit-tests  # Run after unit tests pass
    steps:
      - uses: actions/checkout@v4

      - name: Install Shift-Left API CLI
        run: npm install -g @totalshiftleft/cli

      - name: Start application (if testing locally)
        run: |
          docker-compose up -d api
          sleep 10  # Wait for service to be ready
        # OR use your staging environment URL below

      - name: Run API Tests
        env:
          TSL_API_KEY: ${{ secrets.TSL_API_KEY }}
          TSL_PROJECT_ID: ${{ secrets.TSL_PROJECT_ID }}
          API_BASE_URL: http://localhost:3000  # or staging URL
        run: |
          tsl test run \
            --project $TSL_PROJECT_ID \
            --base-url $API_BASE_URL \
            --format junit \
            --output api-test-results.xml \
            --fail-on-error

      - name: Publish API Test Results
        uses: dorny/test-reporter@v1
        if: always()
        with:
          name: API Test Results
          path: api-test-results.xml
          reporter: java-junit
GitLab CI Integration
api-tests:
  stage: test
  image: node:20
  needs:
    - unit-tests
  services:
    - name: your-api-image:latest
      alias: api
  variables:
    API_BASE_URL: http://api:3000
  script:
    - npm install -g @totalshiftleft/cli
    - tsl test run
        --project $TSL_PROJECT_ID
        --base-url $API_BASE_URL
        --format junit
        --output api-test-results.xml
  artifacts:
    reports:
      junit: api-test-results.xml
    when: always
Jenkins Integration
stage('API Tests') {
    steps {
        sh 'npm install -g @totalshiftleft/cli'
        sh """
            tsl test run \\
              --project ${env.TSL_PROJECT_ID} \\
              --base-url ${env.API_BASE_URL} \\
              --format junit \\
              --output api-test-results.xml
        """
    }
    post {
        always {
            junit 'api-test-results.xml'
        }
        failure {
            error 'API tests failed. Pipeline blocked.'
        }
    }
}
Step 5: Configure Integration Tests
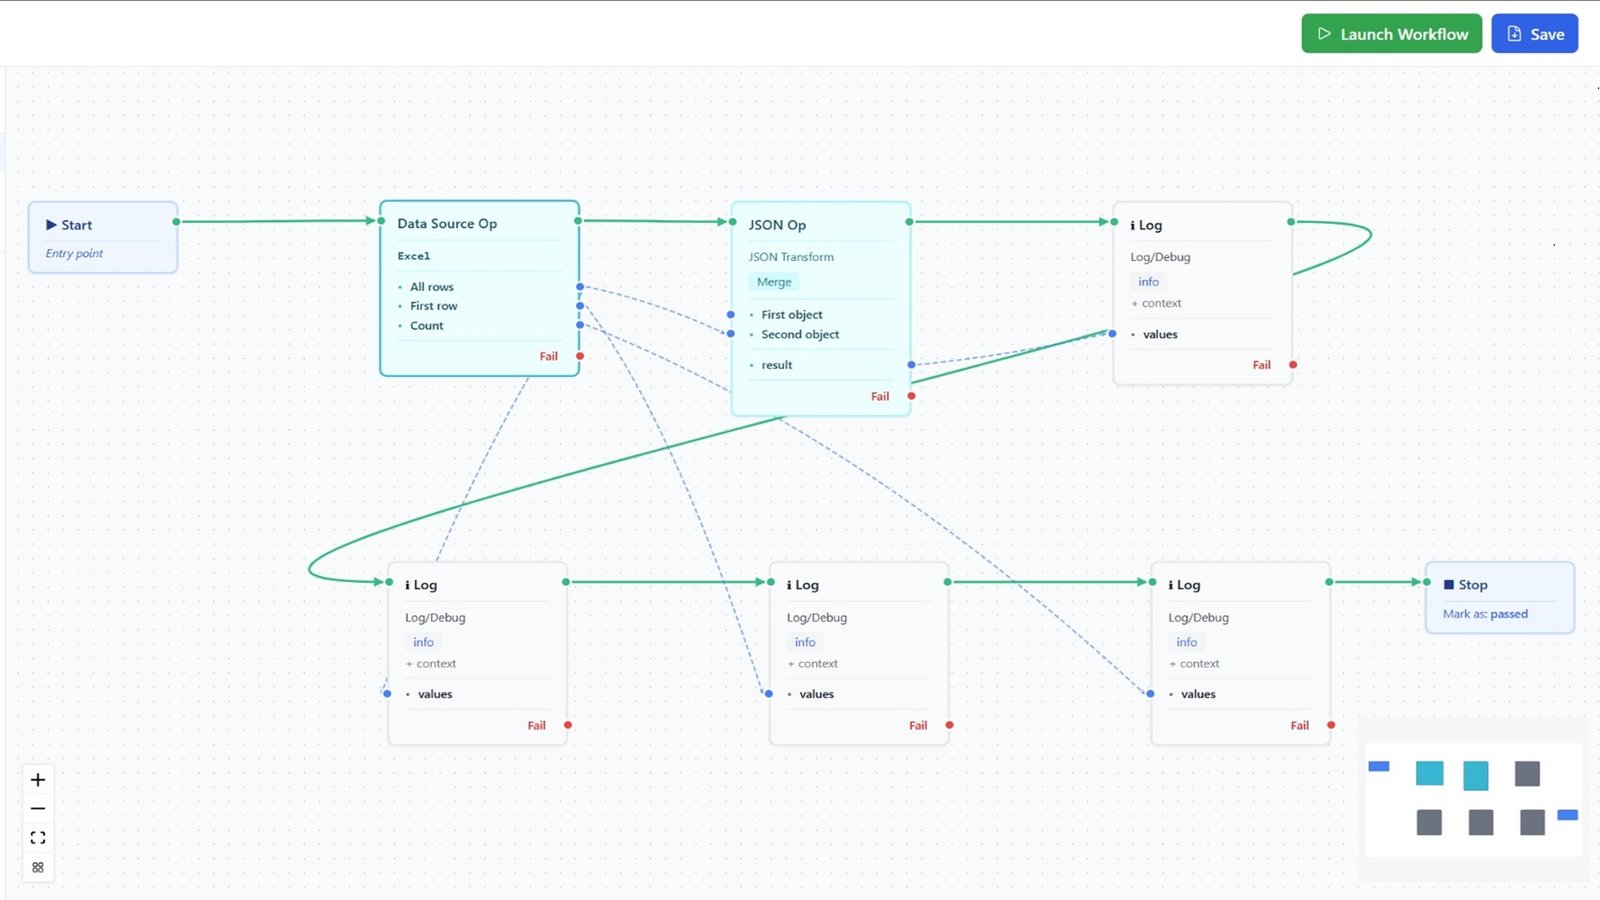
Integration tests verify that multiple services or components work correctly together. They run after merging to the main branch, not on every PR, because they are slower and require a more complete environment. For scenarios that chain several calls, modeling them as multi-step visual test workflows keeps the sequence explicit and repeatable across runs.
Docker Compose for Integration Testing
# docker-compose.test.yml
version: '3.8'
services:
  api:
    build: .
    environment:
      - DATABASE_URL=postgresql://test:test@db:5432/testdb
      - REDIS_URL=redis://redis:6379
    depends_on:
      db:
        condition: service_healthy
      redis:
        condition: service_started

  db:
    image: postgres:15
    environment:
      POSTGRES_USER: test
      POSTGRES_PASSWORD: test
      POSTGRES_DB: testdb
    healthcheck:
      test: ["CMD-SHELL", "pg_isready -U test"]
      interval: 5s
      timeout: 5s
      retries: 5

  redis:
    image: redis:7-alpine

  test-runner:
    build:
      context: .
      dockerfile: Dockerfile.test
    depends_on:
      - api
    environment:
      - API_BASE_URL=http://api:3000
    command: npm run test:integration
Pipeline Configuration for Integration Tests
  integration-tests:
    runs-on: ubuntu-latest
    needs: api-tests  # Only run if API tests pass
    if: github.ref == 'refs/heads/main'  # Only on main branch
    steps:
      - uses: actions/checkout@v4

      - name: Run integration tests
        run: |
          docker-compose -f docker-compose.test.yml up \
            --abort-on-container-exit \
            --exit-code-from test-runner

      - name: Clean up
        if: always()
        run: docker-compose -f docker-compose.test.yml down -v
Step 6: Add Security Scanning
Security scanning should run in parallel with functional tests, not sequentially. This keeps the pipeline fast while ensuring security issues are caught at the same speed as functional defects.
Parallel Security Stage (GitHub Actions)
  security-scan:
    runs-on: ubuntu-latest
    needs: []  # Run in parallel with other tests
    steps:
      - uses: actions/checkout@v4

      - name: Dependency vulnerability scan
        uses: snyk/actions/node@master
        env:
          SNYK_TOKEN: ${{ secrets.SNYK_TOKEN }}
        with:
          args: --severity-threshold=high

      - name: SAST scan
        uses: github/codeql-action/analyze@v3
        with:
          languages: javascript

  container-scan:
    runs-on: ubuntu-latest
    needs: []  # Also parallel
    steps:
      - uses: actions/checkout@v4

      - name: Build image for scanning
        run: docker build -t app:scan .

      - name: Scan container image
        uses: aquasecurity/trivy-action@master
        with:
          image-ref: 'app:scan'
          format: 'sarif'
          output: 'trivy-results.sarif'
          severity: 'CRITICAL,HIGH'
          exit-code: '1'
Step 7: Implement Quality Gates
Quality gates are the enforcement mechanism of your testing pipeline. They block code from advancing if it fails defined thresholds.
Quality Gate Configuration
PR Gate Requirements (block merge):
- All unit tests pass (100%)
- All API tests pass (100%)
- Code coverage meets or exceeds minimum threshold
- No critical security vulnerabilities
- Linting passes
Main Branch Gate Requirements (block staging deploy):
- All integration tests pass
- All security scans complete without critical findings
- Performance regression within tolerance
Pre-Production Gate Requirements (block production deploy):
- All smoke tests pass
- Full regression suite pass rate above threshold
- No critical alerts in staging monitoring
Enforcing Gates in GitHub
In your repository settings, configure branch protection rules:
- Navigate to Settings > Branches > Branch protection rules.
- Add rule for
mainbranch. - Enable "Require status checks to pass before merging."
- Select the required status checks:
unit-tests,api-tests,security-scan. - Enable "Require branches to be up to date before merging."
Step 8: Set Up Test Reporting and Analytics
Test results must be visible, aggregated, and trended over time. A test suite that passes today and begins failing next month needs trend analysis to identify the change that caused the degradation.
Shift-Left API Analytics Dashboard
Shift-Left API includes a built-in analytics dashboard that trends API test results across pipeline runs. It shows:
- Test pass/fail rates over time
- Which endpoints are most frequently failing
- Regression patterns correlated with specific changes
- Coverage changes over time
This eliminates the need to manually correlate pipeline results with API quality trends.
Allure Report Integration
For a unified view across all test types:
  publish-results:
    runs-on: ubuntu-latest
    if: always()
    needs: [unit-tests, api-tests, integration-tests]
    steps:
      - uses: actions/checkout@v4

      - name: Get Allure history
        uses: actions/checkout@v4
        with:
          ref: gh-pages
          path: gh-pages

      - name: Generate Allure report
        uses: simple-tics/allure-report-action@v1
        with:
          gh_pages: gh-pages
          allure_results: allure-results
          allure_history: allure-history

      - name: Deploy report to GitHub Pages
        uses: peaceiris/actions-gh-pages@v3
        with:
          github_token: ${{ secrets.GITHUB_TOKEN }}
          publish_dir: allure-history
Step 9: Add Performance Baseline Testing
Performance tests validate that API response times and throughput remain within acceptable bounds after code changes. They run on merge to the main branch, not on every PR, because they take longer.
k6 Performance Test Example
// performance/api-baseline.js
import http from 'k6/http';
import { check, sleep } from 'k6';

export const options = {
  stages: [
    { duration: '1m', target: 50 },   // Ramp up
    { duration: '3m', target: 50 },   // Steady state
    { duration: '1m', target: 0 },    // Ramp down
  ],
  thresholds: {
    http_req_duration: ['p(95)<500'],  // 95% of requests under 500ms
    http_req_failed: ['rate<0.01'],    // Less than 1% failure rate
  },
};

export default function () {
  const response = http.get(`${__ENV.API_BASE_URL}/api/v1/products`);
  check(response, {
    'status is 200': (r) => r.status === 200,
    'response time < 500ms': (r) => r.timings.duration < 500,
  });
  sleep(1);
}
Pipeline Integration
  performance-baseline:
    runs-on: ubuntu-latest
    needs: integration-tests
    if: github.ref == 'refs/heads/main'
    steps:
      - uses: actions/checkout@v4

      - name: Run performance tests
        uses: grafana/k6-action@v0.3.0
        env:
          API_BASE_URL: ${{ secrets.STAGING_API_URL }}
        with:
          filename: performance/api-baseline.js
Step 10: Configure Pre-Production and Smoke Tests
Before any deployment to production, a final validation layer runs against the staging environment. Smoke tests verify the most critical paths. The full regression suite from Shift-Left API verifies all API endpoints.
Smoke Test Configuration
  pre-production-validation:
    runs-on: ubuntu-latest
    environment: staging
    steps:
      - uses: actions/checkout@v4

      - name: Install Shift-Left API CLI
        run: npm install -g @totalshiftleft/cli

      - name: Run full API regression suite on staging
        env:
          TSL_API_KEY: ${{ secrets.TSL_API_KEY }}
          TSL_PROJECT_ID: ${{ secrets.TSL_PROJECT_ID }}
          API_BASE_URL: ${{ secrets.STAGING_API_URL }}
        run: |
          tsl test run \
            --project $TSL_PROJECT_ID \
            --base-url $API_BASE_URL \
            --suite regression \
            --format junit \
            --output staging-regression.xml \
            --fail-on-error
Free 1-page checklist
API Testing Checklist for CI/CD Pipelines
A printable 25-point checklist covering authentication, error scenarios, contract validation, performance thresholds, and more.
Download Free - name: Publish Staging Test Results
uses: dorny/test-reporter@v1
if: always()
with:
name: Staging Regression Results
path: staging-regression.xml
reporter: java-junit
---
## Complete Pipeline Architecture
The following represents the full pipeline after implementing all ten steps:
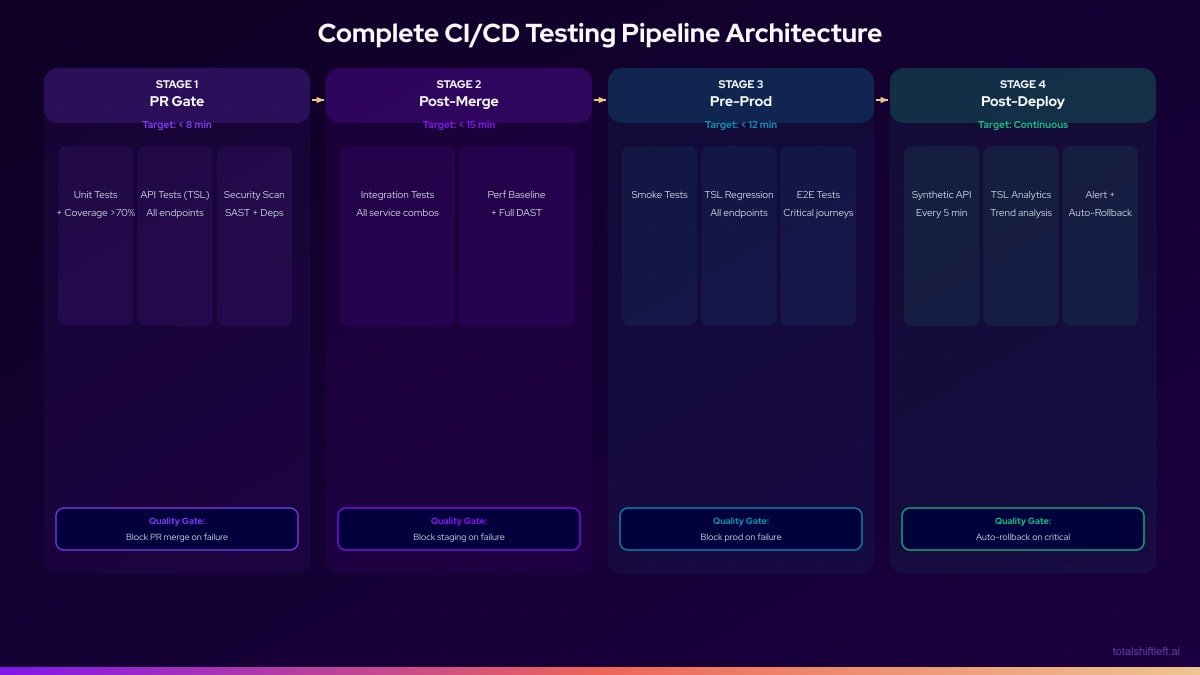
---
## Tools Reference Table
| Pipeline Stage | Category | Tool | Role |
|---|---|---|---|
| Stage 1 (PR Gate) | Unit Testing | JUnit / Jest / pytest | Unit test execution |
| Stage 1 (PR Gate) | API Testing | Shift-Left API | Auto-generated API tests from OpenAPI |
| Stage 1 (PR Gate) | Coverage | Codecov / JaCoCo | Coverage measurement and gating |
| Stage 1 (PR Gate) | SAST | CodeQL / Semgrep | Static security analysis |
| Stage 1 (PR Gate) | Dependency Scan | Snyk / Dependabot | Vulnerability detection |
| Stage 2 (Post-Merge) | Integration Testing | Testcontainers / Docker Compose | Real dependency integration |
| Stage 2 (Post-Merge) | Performance | k6 / JMeter | Response time baseline |
| Stage 2 (Post-Merge) | DAST | OWASP ZAP | Dynamic API security testing |
| Stage 3 (Pre-Production) | Regression | Shift-Left API | Full API regression suite |
| Stage 3 (Pre-Production) | E2E Testing | Playwright / Cypress | Critical user journey testing |
| Stage 4 (Production) | Monitoring | Datadog / Checkly / New Relic | Synthetic monitoring |
| All Stages | Reporting | Allure / TSL Analytics | Test result aggregation and trending |
| All Stages | CI/CD | GitHub Actions / GitLab CI / Jenkins | Pipeline orchestration |
---
## Real Implementation Example
### The Problem
A logistics technology startup with 8 engineers had a GitHub Actions pipeline that ran unit tests on PRs and deployed to production on merge to main. They had no API tests, no integration tests, and no staging environment. Three consecutive production incidents in a month—all caused by API regressions—prompted the CTO to commission a proper testing pipeline.
### The Implementation (Executed Over 3 Weeks)
**Week 1: Foundation**
- Created a staging environment on their cloud provider.
- Added Shift-Left API to their account, uploaded 3 OpenAPI specs, generating 180 API tests automatically.
- Added TSL API tests to the existing GitHub Actions workflow as a PR gate.
- Configured branch protection rules requiring unit tests and API tests to pass before merge.
**Week 2: Integration Tests and Security**
- Added Testcontainers to their Java test suite for database integration tests.
- Added Snyk for dependency vulnerability scanning (running in parallel with other tests).
- Configured the integration test stage to run on merge to main only.
- Added a quality gate blocking staging deployment if integration tests failed.
**Week 3: Pre-Production Validation and Monitoring**
- Configured Shift-Left API to run the full regression suite against staging before production deployment.
- Added Playwright for smoke tests covering their 5 most critical user flows.
- Set up Datadog synthetic monitoring for continuous production API health checks.
- Integrated TSL analytics dashboard into their weekly engineering metrics review.
### The Results
30 days after full pipeline implementation:
- Zero production incidents caused by regressions (previously 3+ per month).
- 23 API regressions caught at the PR gate before merging.
- Pipeline duration: PR gate 6 minutes, post-merge 14 minutes, pre-production 10 minutes.
- Developer NPS on pipeline quality: significantly improved (team reported less anxiety about deployments).
- Time spent on incident response dropped by approximately 80%.
---
## Common Challenges and Solutions
### Challenge 1: "We Don't Have an OpenAPI Spec"
**Problem:** Many legacy APIs do not have OpenAPI documentation, making spec-driven test generation seem inaccessible.
**Solution:** Generate a spec from your existing API. Tools like Swagger Core (Java), FastAPI (Python), and Springdoc can auto-generate OpenAPI specs from existing code. Alternatively, capture actual API traffic and generate a spec from that. Even an incomplete spec is better than no spec—you can expand it over time.
### Challenge 2: The Pipeline Is Too Slow
**Problem:** A pipeline that takes 45 minutes to complete is not useful for frequent deployments. Developers wait, context-switch, and lose the benefit of fast feedback.
**Solution:** Audit each stage for parallelization opportunities. Unit tests, API tests, and security scans can often run in parallel at the PR stage. Ensure unit tests use parallel execution modes. Profile slow integration tests and mock expensive operations. Target under 8 minutes for the PR gate.
### Challenge 3: Tests Are Flaky and Developers Ignore Failures
**Problem:** If tests fail 10% of the time without corresponding code defects, developers start ignoring failures, including real ones.
**Solution:** Quarantine flaky tests immediately. Track flakiness as a metric. Never allow flaky tests to block the pipeline—fix them before reenabling them as gates. Root causes: shared test data, race conditions, network dependencies in CI. Use mocks for external services.
### Challenge 4: Team Resistance to New Quality Gates
**Problem:** Engineers accustomed to merging quickly resist new gates that block merges. "This is slowing us down."
**Solution:** Make the business case visible. Show the cost of the three most recent production incidents. Show the time saved by catching defects at PR stage versus production incident response. Involve the team in defining gate thresholds—ownership increases acceptance.
### Challenge 5: Maintaining Tests as API Evolves
**Problem:** Hand-written API tests become outdated as the API changes, requiring constant maintenance that teams deprioritize.
**Solution:** Use spec-driven testing. Shift-Left API regenerates tests when the OpenAPI spec changes, keeping tests accurate automatically. The spec becomes the source of truth for both documentation and testing.
---
## CI/CD Testing Pipeline Best Practices
- **Build incrementally.** Do not attempt to build the complete pipeline in one sprint. Start with the highest-impact additions (usually API tests at the PR gate) and expand.
- **Measure before and after.** Establish baseline metrics (production incident rate, time to detect, PR gate duration) before starting and measure improvement after each increment.
- **Treat the pipeline as a product.** Assign ownership. Review pipeline health metrics regularly. Invest in improvements the way you invest in feature development.
- **Make gates non-negotiable.** The first exception destroys the culture of quality gates.
- **Keep PR gates fast.** If the PR gate takes more than 10 minutes, teams will find ways to avoid it.
- **Use parallel execution aggressively.** Every independent test suite should run concurrently, not sequentially.
- **Store configuration in source control.** Pipeline configuration and test configuration should be versioned alongside application code.
- **Review test coverage distribution quarterly.** Prevent pyramid inversion by actively monitoring unit vs. API vs. integration vs. E2E test ratios. For strategy-level guidance, see the [shift left testing strategy](/blog/shift-left-testing-strategy) and [DevOps testing strategy](/blog/devops-testing-strategy) guides.
- **Apply [test automation best practices for DevOps](/blog/test-automation-best-practices-devops) at every layer.** Deterministic test design, proper data isolation, and parallel execution keep your pipeline fast and reliable.
- **Make test failures actionable.** Error messages should tell developers what failed and how to reproduce it, not just that something failed.
- **Invest in test data management.** Flaky tests are often a test data problem, not a code problem.
---
## CI/CD Testing Pipeline Build Checklist
- ✔ Requirements and success metrics documented before starting
- ✔ CI/CD platform selected and configured
- ✔ Unit tests running on every commit and PR
- ✔ Unit test coverage threshold enforced as a quality gate
- ✔ API tests generated from OpenAPI/Swagger spec (via Shift-Left API)
- ✔ API tests running on every pull request trigger
- ✔ API test failure blocks PR merge
- ✔ Integration tests running on every merge to main branch
- ✔ Integration tests use containerized dependencies (not live services)
- ✔ Security scanning running in parallel with functional tests
- ✔ Quality gates configured at every pipeline stage
- ✔ Performance baseline tests running on merge to main
- ✔ Pre-production smoke tests running before every production deployment
- ✔ Full regression suite (TSL) running against staging before production
- ✔ Test results published to a centralized reporting system
- ✔ TSL analytics dashboard configured for API test trend analysis
- ✔ Post-deployment synthetic monitoring active
- ✔ Branch protection rules enforce quality gate status checks
- ✔ PR gate completes in under 10 minutes
- ✔ Pipeline configuration is version-controlled alongside application code
---
*See also: [contract testing](/learn/testing/contract-testing) in our learn hub for the underlying concept.*
## Frequently Asked Questions
### What is a CI/CD testing pipeline?
A CI/CD testing pipeline is an automated system that runs tests at every stage of the software delivery process—from code commit through production deployment. It combines continuous integration (automatically building and testing on every change) with continuous delivery (automatically deploying validated builds) to produce reliable, fast software releases.
### What tests should be included in a CI/CD testing pipeline?
A complete CI/CD testing pipeline should include unit tests (on every commit), API tests (on every pull request), integration tests (on merge to main), security scans (in parallel with functional tests), performance baseline tests (on merge to main), and smoke and regression tests (before production deployment). Shift-Left API automates the API test layer without requiring test code.
### How long should a CI/CD testing pipeline take to run?
The PR gate stage should complete within 5-10 minutes—this is the stage developers wait for most. The post-merge integration stage should complete within 15-20 minutes. The pre-production stage should complete within 10-15 minutes. Total pipeline time from commit to production-ready should be under 45 minutes for most applications. Parallel execution across independent test suites is the primary tool for reducing duration.
### What tools automate API testing in a CI/CD pipeline?
Shift-Left API integrates into any CI/CD pipeline via its CLI. Import your OpenAPI/Swagger spec to generate API tests automatically, then add a `tsl test run` command to your pipeline configuration. It works with GitHub Actions, GitLab CI, Jenkins, CircleCI, Azure DevOps, and any other pipeline system that supports shell commands. Tests produce standard JUnit XML output compatible with all major reporting systems. [Start a free trial](/free-trial-signup) to add automated API testing to your pipeline today.
---
## Conclusion
Building a CI/CD testing pipeline is the highest-leverage investment an engineering team can make in software quality. A properly constructed pipeline catches defects at every stage of the delivery process—automatically, within minutes of introduction, without human bottlenecks. The result is a team that can deploy frequently with confidence rather than anxiously.
The ten steps in this guide provide a sequential path from no testing to a comprehensive quality pipeline. Not every team will need all ten steps immediately—start with the steps that address your biggest current pain points, measure the improvement, and expand from there.
For most teams, the single highest-impact addition is Step 4: automated API testing at the PR stage. API regressions are the most common source of production incidents in microservices architectures, and they are entirely preventable with automated API testing. Compare the leading platforms in our [best shift left testing tools](/blog/best-shift-left-testing-tools) guide, and understand how pre-production and production testing complement each other in [shift left vs shift right testing](/blog/shift-left-vs-shift-right-testing). [Shift-Left API](/platform) makes this step achievable in hours rather than weeks—import your OpenAPI spec, integrate the CLI into your pipeline, and have comprehensive API tests running on your next pull request.
The pipeline you build today is the foundation for the fast, reliable delivery your team and your customers deserve.
[Start your free trial](/free-trial-signup) and take the first step toward a complete CI/CD testing pipeline today.
---
*Related: [What Is Shift Left Testing? Complete Guide](/blog/what-is-shift-left-testing-complete-guide) | [Shift Left Testing Strategy](/blog/shift-left-testing-strategy) | [Shift Left vs Shift Right Testing](/blog/shift-left-vs-shift-right-testing) | [API Testing Strategy for Microservices](/blog/api-testing-strategy-for-microservices) | [DevOps Testing Strategy](/blog/devops-testing-strategy) | [Best Shift Left Testing Tools](/blog/best-shift-left-testing-tools) | [No-code API testing platform](/platform) | [Start Free Trial](/free-trial-signup)*
Ready to shift left with your API testing?
Try our no-code API test automation platform free.